¶ Guide: First 3 steps
Application: Nomid MDM
Document: V1.1.0
Last updated: 02/07/2026
Editorial owner: Nomid MDM Documentation
Last editorial review: 02/07/2026
Editorial language: en-US
Important: Perform onboarding with an authorized institutional account and validate each stage before continuing. Bindings created with the wrong account or company may require administrative intervention to correct.
¶ Goal of this guide
This guide explains, with the highest practical detail, how to execute the first 3 steps of Nomid MDM:
- Connect Google Workspace / managed Google environment
- Create the first policy
- Perform the first device enrollment
It also describes the part where the operator temporarily leaves Nomid and interacts with Google screens, which is exactly the part that tends to generate the most doubt.
To understand the portal screens used in this flow, also see Login, menu, and help, Integrations, Policies, and Devices.
Use this article as an entry route. When you reach policy creation, follow the full procedure in New policy; when you reach equipment registration, follow New device.
¶ Flow overview
On Nomid’s home screen, the quick-start process appears as a sequence of three actions:
- Connect Google Workspace
- Create your first policy
- Enroll your first device

The flow logic is:
- first you connect the Google environment that will support Android Enterprise / Managed Google Play;
- then you create the policy that will define how the device will be managed;
- finally you use that ready structure to put the first device under management.
If step 1 is not completed correctly, the rest is usually limited or unfeasible, because the Android management ecosystem depends on this link to the Google environment.
¶ Prerequisites before starting
Before clicking the first button, validate these points:
¶ 1) Nomid access
You must log in to the Nomid portal with a user who has permission to:
- configure integrations
- create policies
- perform device enrollment
If the user has a restricted profile, they may be able to view the initial area, but not necessarily complete the connection or save policies.
¶ 2) Correct Google account
You need to have a Google account available that will be used for the Android Enterprise / managed Google link.
In practice, this means the person executing the process must have:
- access to the correct Google account for the organization, or
- authorization to use the account that will be linked to the company
¶ 3) Responsibility defined in advance
It is important to decide beforehand:
- which Google account will be linked to the environment
- who will be responsible for that account
- whether the account will be institutional and controlled by the company
This prevents linking a wrong personal account, which usually becomes an operational problem later.
¶ 4) Browser and session
Ideally:
- use an updated browser
- avoid multiple Google accounts open in the same browser
- if more than one account is logged in, carefully confirm which account Google is selecting
This is one of the most common errors during onboarding.
¶ Step 1 — Connect Google Workspace
¶ What this step does
On the initial screen, the first block is Connect Google Workspace and the text says that it:
- takes about 30 seconds
- configures Managed Google Play for app distribution
- does not give Nomid access to the user’s personal data
In practical terms, this step is for:
- enabling the Google basis required for Android Enterprise
- allowing management of corporate apps
- enabling distribution and approval of apps via Managed Google Play
- associating the Nomid company with the managed Google environment
¶ Detailed step-by-step inside Nomid
-
Access the company home screen
Log in to the correct Nomid company and locate the onboarding screen. You should see the first 3 steps listed. The first is Connect Google Workspace.
-
Click the connection button
On the screen there is a main button related to Google Workspace connection. Click it.
When you click, the system typically starts a redirect to Google authentication/authorization.
-
Wait for the redirect
The browser will open a Google screen. Depending on your environment, this may happen:
- in the same tab
- in a popup
- in a new tab
If popup blocking is enabled, allow the opening. If a pre-authenticated Google account causes trouble, use an incognito window.

¶ Step 1.1 — What happens on the Google screens
¶ Google screen — account selection

When you enter the Google flow, the first screen is usually account selection.
What the operator should do
- check which account is displayed
- confirm it is the correct organizational account
- avoid choosing a personal account by mistake
- click the correct account
Important precautions
If multiple accounts are logged in, Google may automatically suggest an account that is not the intended one.
The operator should carefully check:
- account domain
- displayed name
- whether this account should represent the company in the Android Enterprise link
¶ Google screen — login, if required
If the account is not authenticated, Google will ask for:
- password
- possibly two-step verification
What the operator should do
- enter the correct account email
- click Next
- enter the password
- complete MFA if prompted
Attention
If authentication fails or the account lacks proper permissions, the flow may stop before final authorization.
¶ Google screen — consent / authorization
After login, a screen typically appears asking authorization for Nomid to link with the necessary Google services for Android management.
This screen may vary depending on whether the account is personal or business. Below, we detail the two main scenarios.
¶ Case of using a personal account

What the operator will see
Generally, this screen shows:
- the integration name
- the personal account being used
- buttons like Allow / Continue / Accept
What the operator should do
- read the account name shown at the top
- confirm it is the correct Nomid company
- click to continue and authorize
What this authorization means
It does not mean Nomid will read emails, files, or private content. The initial Nomid screen already makes clear that Managed Google Play setup is done without access to users’ personal data.
In practice, the authorization establishes the administrative link needed for Android Enterprise.
¶ Case of using a business account

What the operator will see
Generally, this screen shows:
- the integration name
- the business account being used
- buttons like Allow / Continue / Accept
- possibly indications of administrative or organizational permissions
What the operator should do
- read the account name shown at the top
- confirm it is the correct Nomid company
- verify that the account has adequate permissions for the business environment
- click to continue and authorize
What this authorization means
Similar to the personal case, but focused on organizational permissions. It does not mean access to personal data, but rather corporate management via Android Enterprise.
¶ Google screen — creation/association of managed environment
Depending on the account’s prior state, Google may show additional screens to:
- confirm creation of a managed environment
- associate the organization
- accept Android Enterprise / Managed Google Play terms
- confirm company or administrator name
What the operator should do
- follow the confirmation flow
- review the displayed organization name
- proceed until Google indicates completion
Possible variations
This section can vary depending on:
- whether the account already had a prior link
- whether the company is configured for the first time
- whether the domain was previously used with another EMM
- whether Google requires extra confirmation
¶ Return to Nomid
After authorizing in Google, the browser should return to Nomid automatically.
What should happen in Nomid
On return, the system typically marks the first step as completed or updates the onboarding state.
In practice, you should visually confirm that:
- the connection finished
- the previous button no longer asks for a connection
- the flow progressed to the policy creation step
If the return does not happen automatically, refresh carefully or go back to the Nomid tab.
¶ How to validate step 1 succeeded
Consider step 1 complete only if there are objective signs in Nomid, such as:
- visual indication of completed step
- no longer seeing the connect Google Workspace warning
- apps/policies area associated with Android Enterprise is available
- ability to proceed normally to the next step
Common failure causes include:
- wrong Google account
- confusing Google session with multiple logins
- popup/redirect blocked
- insufficient Nomid permission
- attempting to link something already associated with another environment
¶ Step 2 — Create your first policy
¶ What this step does
After connecting with Google, the next step is Create your first policy.
The policy is the set of rules that defines how the device behaves under management. It usually includes:
- required apps
- restrictions
- security behavior
- device usage mode
- corporate settings
Without a policy, enrollment can exist in some scenarios, but it lacks consistent management.
¶ Goal of the first policy
Since this is the first practical step, the correct guidance is to create a simple, functional, and safe policy to validate onboarding without overcomplicating things.
The first policy should be designed to:
- prove the flow is working
- serve as a test baseline
- avoid excessive restrictions at the start
- allow confirmation that the device receives commands correctly
¶ Detailed step-by-step to create the first policy
-
Access the policy area
In Nomid, click Create your first policy or open New policy from the Provisioning menu.
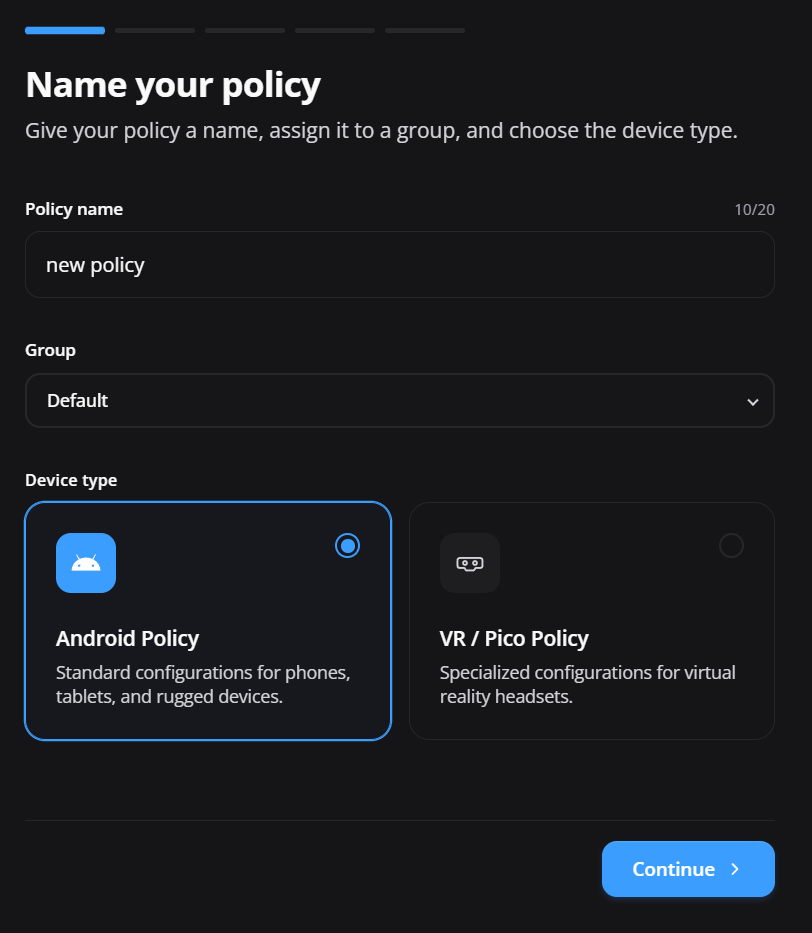
-
Start creation
Click New Policy to create a policy from scratch. This action opens the creation wizard described in New policy.
-
Set a clear name
Use a simple operational name, for example:
- Initial Policy
- Android Test Policy
- Nomid Base Policy
Avoid vague names like “test 1,” because that becomes confusing later.
If the editor includes a description field, use it to explain the profile’s purpose.
-
Define the policy objective
Before filling any field, be clear about the first profile’s purpose. Example:
- validate enrollment
- apply a required app
- test basic management
- prepare a base for kiosk or future production
-
Configure the minimum required settings
For the first policy, focus on the basics:
- policy identification
- device default behavior
- essential apps, if applicable
- truly necessary initial restrictions
If presented with a device management mode, keep the first profile in Android Enterprise / Device Owner or Work Profile mode.
-
Review fields carefully
When filling out the policy, verify:
- the name is correct
- there is no excessive blocking
- there is no configuration that prevents the test
- defined apps exist and are allowed
Avoid enabling advanced rules or complex network settings in the first test.
-
Save the policy
After reviewing, click save.
-
Confirm it was created
Validate the policy appears in the list and is available for device enrollment.

¶ What to watch for when creating the first policy
The classic mistake is trying to build the “final” policy right away.
That hurts because:
- it increases the chance of an error
- it makes it harder to find the problematic part
- it may block basic device functions before validating onboarding
The best path is:
- create a lean initial policy
- test it on the first device
- then evolve to stricter profiles
¶ Policy validation checklist
Before moving to enrollment, confirm:
- policy was saved without error
- it appears in the policy list
- it can be assigned to a device
- there is no absurd restriction that prevents initial setup
¶ Step 3 — Enroll your first device
¶ What this step does
The third action shown on the screen is Enroll your first device.
Here you take the full structure prepared in the previous steps and place a real device under Nomid management.
This phase proves that:
- the Google link works
- the policy is valid
- the device enters the managed environment correctly
¶ What enrollment means in practice
Enrollment is the process of bringing the device into MDM management.
In simple terms, this is when the device:
- identifies itself as a managed device
- gets linked to the company
- starts downloading/applying the policy
- begins obeying rules defined in Nomid
¶ Device preparation before enrollment
Before starting, confirm the device:
-
Device state
Ideally the device is:
- new, or
- factory reset, or
- in a state compatible with the chosen enrollment method
For Zero-touch or KME, the device should be factory fresh or reset.
-
Connectivity
Ensure internet access via:
- working Wi-Fi, or
- working mobile network
Without connectivity, enrollment can fail or remain incomplete.
-
Battery
Ensure sufficient battery or keep it plugged in.
-
Enrollment method defined
Before starting, know which method will be used. Example:
- QR code
- token
- zero-touch
- KME
- afw#setup
- other supported method in your operational flow
Some methods, like Zero-touch and KME, use the Nomid token/QR to start enrollment automatically.
To prepare these methods, follow the Zero-touch or Knox Mobile Enrollment guide.
¶ Detailed step-by-step for first enrollment
-
In Nomid, open the enrollment step
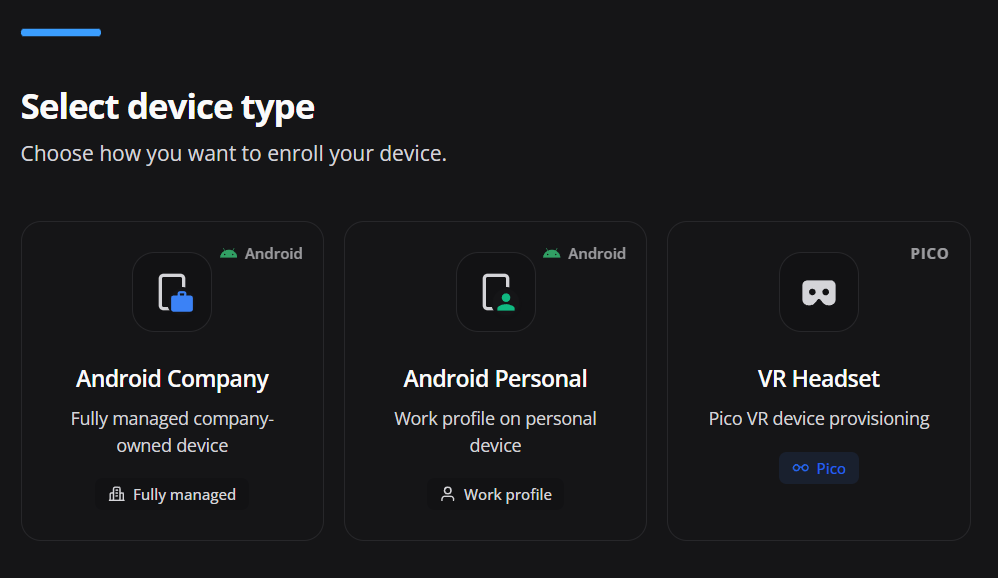
Click Enroll your first device or open New device to launch the registration wizard.
-
Choose the enrollment method
Nomid should display the available ways to register the device.
If the method is Zero-touch or KME, it may be more automatic: the device can be directed to the Nomid enrollment flow as soon as it powers on and connects to the internet.
-
Select the policy to apply
Assign the device to the policy you just created.
This is important: the first device should receive a simple, stable, validated policy.
-
Generate enrollment data
Depending on the method, Nomid may generate:
- QR code
- code/token
- link
- specific provisioning instruction
In KME/Zero-touch scenarios, the code/token is used inside the provisioning profile and can associate the device automatically.
-
Go to the device
On the physical device, start the setup or provisioning process according to the chosen method.
-
Enter/scan the data
Execute the corresponding procedure:
- scan the QR code
- type the code
- use the enrollment identifier
- follow the Android Enterprise flow
For
afw#setup, type this code when Android asks for the setup method. -
Wait for provisioning
The device will:
- validate connectivity
- communicate with Google services
- download necessary components
- register the management
- apply the policy
-
Confirm in Nomid
After enrollment, the device should appear in the portal with status reflecting the completed registration.

¶ What happens on Google/Android screens during enrollment
¶ Typical device flow
-
Android welcome screen
The operator powers on the device or starts the setup after reset.
-
Network connection
Android requests internet to continue.
-
Entrance into management flow
Depending on the chosen method, the device enters the Android Enterprise flow.
-
Google validations
The system may:
- validate the provisioning method
- check flow integrity
- download management components
- prepare the device profile
-
Administration registration
After this, the device recognizes it will be corporately managed.
-
Policy application
At the end of the Google/Android portion, the device communicates with Nomid and begins receiving the policy.
¶ How to validate the 3 steps completed successfully
At the end of the process, you should be able to confirm:
-
Google connection completed
Expected signs:
- step 1 marked complete
- Android Enterprise environment active
- Nomid flow released for use
-
First policy created
Expected signs:
- policy saved
- policy visible in the system
- policy available for assignment
-
First device enrolled
Expected signs:
- device registered in the company
- policy associated
- consistent status in the portal
- beginning of rule application
¶ Common errors that usually occur
¶ Error 1 — Connecting with the wrong Google account
This usually happens when multiple accounts are open in the browser.
How to avoid
- use an incognito window if needed
- sign out unnecessary accounts
- check the email before authorizing
¶ Error 2 — Thinking step 1 is finished just because you returned from Google
Returning to Nomid is not enough. You need to verify that the system actually marked the integration as complete.
How to avoid
- confirm the step’s visual status
- validate that policy creation and enrollment advance normally
¶ Error 3 — Creating too complex a policy on the first test
This delays initial validation.
How to avoid
- start with a simple policy
- test first
- harden later
¶ Error 4 — Doing enrollment without a ready policy
This creates a badly validated onboarding.
How to avoid
- complete step 2 before step 3
- explicitly assign the correct policy
¶ Error 5 — Network problems on the device
Many enrollment failures are only poor connectivity.
How to avoid
- test Wi-Fi first
- ensure stable internet
- avoid captive portal networks or strange blocks
¶ Operator short version
¶ Step 1 — Connect Google Workspace
- log in to Nomid
- click Connect Google Workspace
- select the correct Google account
- authenticate
- authorize the link
- return to Nomid and confirm completion
¶ Step 2 — Create the first policy
- open the policy area
- create a new policy
- give a clear name
- configure the basics
- save
- confirm the policy is available
¶ Step 3 — Perform first enrollment
- open the enrollment step
- choose the method
- assign the created policy
- generate QR/code/instruction
- execute setup on the device
- complete provisioning
- confirm in the portal that the device enrolled correctly