¶ ¶ User Manual — Login, Menu and Help
Application or layer: Portal Nomid MDM
Document: V1.0.0
Last updated: 17/06/2026
Language: en_US
This manual explains the common elements of the Nomid MDM portal: login screen, user menu, side menu, quick actions and help channels. These functions appear before or during the use of other modules and are used to access the platform, change companies, open support and navigate between MDM areas.
Important: The options displayed may vary depending on the user profile, permissions granted, integrations enabled and company selected.
¶ ¶ Login
¶ ¶ Login screen
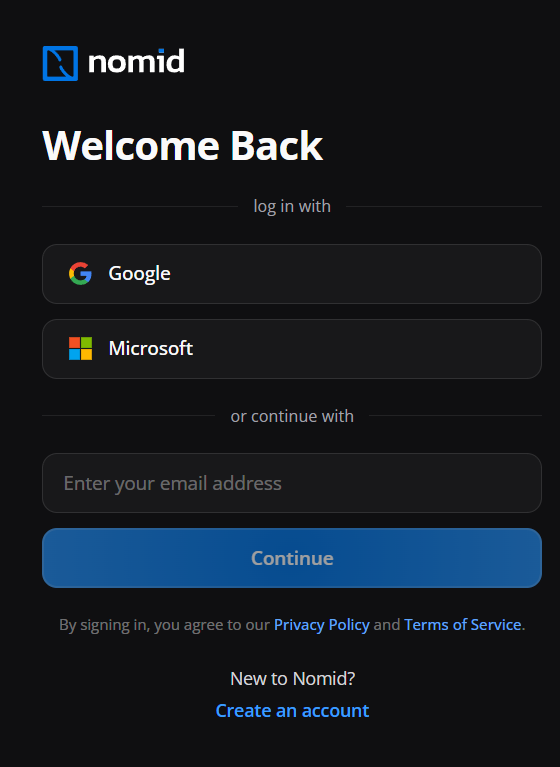
The initial authentication screen of the Nomid MDM Portal, with the access options available to the organization.
This area is used to log into the administrative environment using Google SSO, Microsoft SSO or local credentials, depending on the method enabled in the tenant. It also gives access to account creation/recovery flows, when enabled.
¶ ¶ Featured elements
- Google: initiates authentication via Google account or Google Workspace when this provider is enabled for the organization.
- Microsoft: initiates authentication via Microsoft account/Entra ID when the company centralizes access to this provider.
- Email: identifies the local or corporate user who will be authenticated on the portal.
- Password: validates the local credential when user and password access is allowed.
- Create account: opens the registration flow when the organization allows the creation of new accesses.
- Access recovery: directs the user to reset the password or resend authentication when blocked or forgotten.
¶ ¶ Operational guidance
- Choose the provider configured by the company or enter email and password in the local fields. Then confirm the login. If access is denied, validate that the user exists in Settings > Platform Users, is active and has a role with permission to access the portal.
- Before saving, publishing, or running commands, confirm that the selected company, group, policy, or device matches the desired scope.
The login screen is the gateway to the Nomid MDM portal. Through it, the user accesses the organization in which they have administrative permission.
¶ ¶ Access methods
- Google: use when the organization has configured authentication via a Google or Google Workspace account.
- Microsoft: use when the organization has configured Microsoft account authentication or Entra ID/Azure AD.
- Email and password: use when local access to the portal is enabled for your user.
- Create account: available when the creation/self-registration flow is enabled.
- Access recovery: use when the password has been forgotten or when it is necessary to start a new authentication flow.
¶ ¶ Good practices
- Confirm that you are using the correct organization email.
- Do not share portal access credentials.
- Use SSO whenever your company requires centralized authentication.
- If access is denied, first validate that the user was created in Settings > Platform Users and has sufficient role/permissions.
¶ ¶ User menu
¶ ¶ User Menu
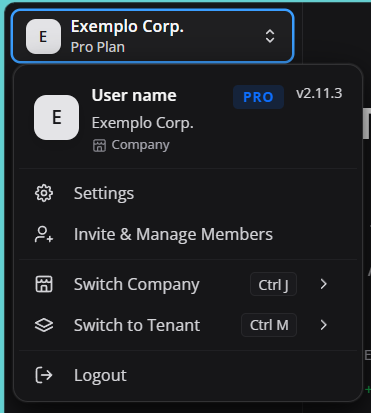
The menu opened by the logged in user, normally in the top corner of the portal.
This area is used to review session information, access settings, manage members, switch companies/tenants, and exit safely. It is especially useful for administrators who serve more than one organization.
¶ ¶ Featured elements
- User ID: displays name, email and active company, helping to confirm in which environment the administrator is operating.
- Settings: opens account, organization, users, security, billing and API settings.
- Invite & Manage Members: leads to the management of platform members when the profile has administrative permission.
- Switch Company: switches between companies linked to the same user, essential for MSPs and multi-company administrators.
- Switch to Tenant: switches the operational tenant when access covers more than one Nomid environment.
- Logout: ends the session and reduces the risk of misuse on shared computers.
¶ ¶ Operational guidance
- Click on the avatar or user name and select the desired action. Use Switch Company or Switch to Tenant before operating another customer's devices and policies. Use Logout when finished, especially on shared computers.
- Before saving, publishing, or running commands, confirm that the selected company, group, policy, or device matches the desired scope.
The user menu is in the top corner of the portal and contains personal options, organization changes and secure exit from the session.
¶ ¶ Main options
- User data: shows name, email and currently selected company.
- Plan/tenant identification: displays summary information about the organization or contracted plan, when available.
- Settings: opens the portal settings area.
- Invite & Manage Members: leads to the management of platform users, when the profile has permission.
- Switch Company: allows you to switch between companies to which the user has access.
- Switch to Tenant: allows switching to another tenant linked to the user, when applicable.
- Logout: closes the current session.
Attention: When changing companies or tenants, the devices, policies, libraries, integrations and users displayed become those of the selected organization.
¶ ¶ Ask Nomid
¶ ¶ Ask Nomid
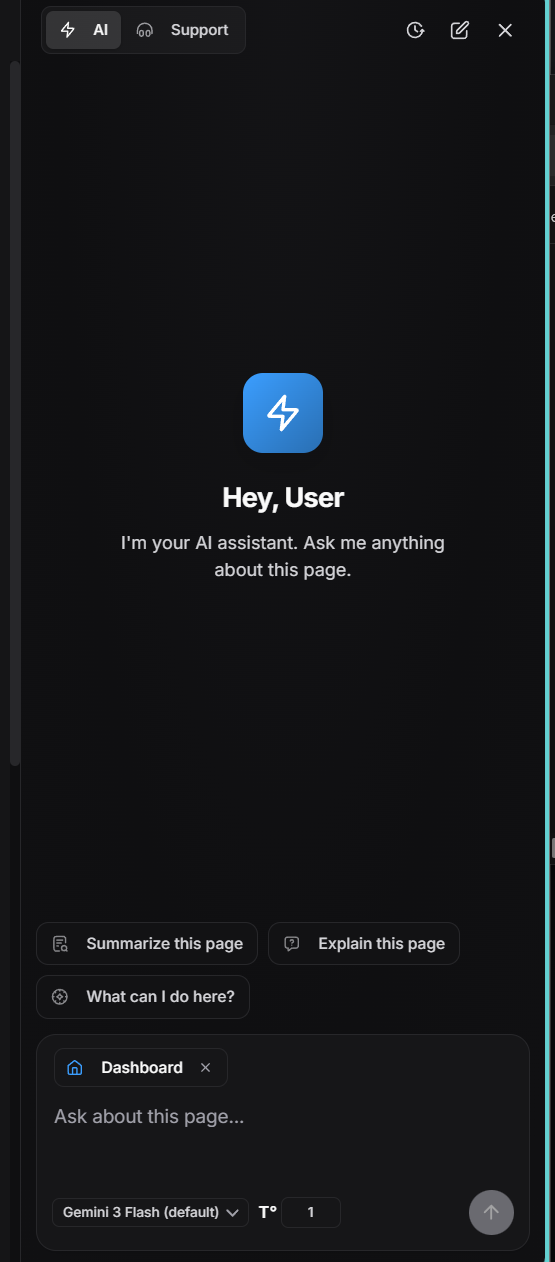
The Ask Nomid area, support assistant within the portal.
This area is used to answer questions about navigation, policies, devices, integrations and operating procedures without leaving the platform. It also helps transform an operational doubt into a clearer path to action.
¶ ¶ Featured elements
- Conversation field: receives questions about MDM navigation, policies, devices, provisioning and operation.
- Context of the question: must include module, policy, device, error or objective so that the answer is more precise.
- Assisted response: guides the administrator to the correct area of the portal or to the recommended procedure.
- Service with history: facilitates continued support because the question is described objectively.
¶ ¶ Operational guidance
- Access the assistant, describe the question with objective context and send it. For better answers, please provide module, policy name, device model, observed error, or configuration objective. Example: “where do I configure APN in a policy?”
- Before saving, publishing, or running commands, confirm that the selected company, group, policy, or device matches the desired scope.
Ask Nomid is the support assistant within the portal. It helps you locate information, answer questions about MDM functions and initiate service with more context.
¶ ¶ When to use
- To understand where a configuration is.
- For quick questions about devices, policies, provisioning or integrations.
- To consult documentation without leaving the portal.
- To initiate a support request describing the issue you observed.
¶ ¶ How to get a better answer
Describe the problem with objective data. Examples:
- “How do I change a device’s policy?”
- “Where do I configure APN in a policy?”
- “The device has been offline since yesterday; what should I check?”
- “How do I access location history?”
¶ ¶ Side menu
¶ ¶ Side menu
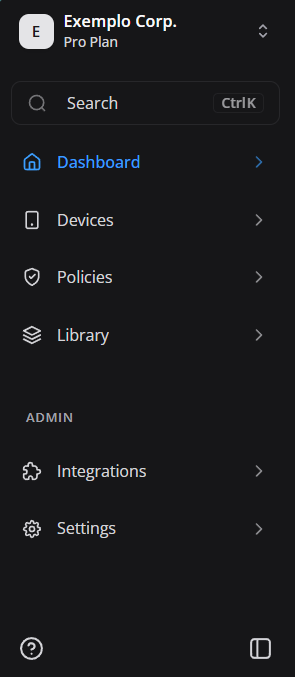
The side menu with the main areas of Nomid MDM.
This area is used to navigate between Dashboard, Devices, Policies, Library, Integrations and Settings. This menu is the basis for moving between fleet operation, policy configuration, and tenant administration.
¶ ¶ Featured elements
- Dashboard: opens the general fleet indicators, alerts, maps, consumption, safety and use.
- Devices: opens the inventory, data sheet, telemetry, location and remote actions of devices.
- Policies: opens the creation and maintenance of rules applied to managed Android devices.
- Library: centralizes applications, contacts, links and reusable resources in policies.
- Integrations: organizes links with Android Enterprise, Zero-touch, SSO and external services.
- Settings: concentrates account administration, users, roles, security, billing and API.
- Collapse/Expand Menu: changes the width of the side menu to free up more workspace.
¶ ¶ Operational guidance
- Click on the item corresponding to the module you want to use. If an option does not appear, review the user's role permissions in Settings > Roles & Permissions or confirm that the module is available in the plan/tenant.
- Before saving, publishing, or running commands, confirm that the selected company, group, policy, or device matches the desired scope.
The side menu organizes the main areas of Nomid MDM.
¶ ¶ Main areas
- Dashboard: summary view of the fleet, indicators, maps, consumption and alerts.
- Devices: device inventory, technical data sheet, telemetry, remote actions and location.
- Policies: creation and maintenance of rules applied to devices.
- Library: library of applications, contacts, links and other reusable resources.
- Integrations: integrations with Android Enterprise, Zero-touch, SSO and other services.
- Settings: account, organization, users, roles, security, billing and API settings.
¶ ¶ Navigation
Click on the module name to open the desired area. Items with an arrow can contain submenus. The button in the footer allows you to collapse or expand the menu to gain space on the screen.
¶ ¶ Contextual actions and shortcuts
¶ ¶ Contextual actions
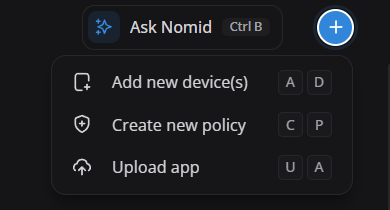
A contextual actions menu opened on a portal item.
This area is used to perform operations related to the selected item, such as opening details, editing, duplicating, changing association, exporting, or removing, depending on the module and permissions.
¶ ¶ Featured elements
- Ask Nomid: triggers assisted support within the context of the current screen.
- Add new device(s): starts the registration or provisioning of new devices in the fleet.
- Create new policy: opens the flow of creating a policy for future application on devices.
- Upload app: directs you to upload or register applications in the library.
- Keyboard shortcuts: show combinations to perform frequent actions faster.
¶ ¶ Operational guidance
- Locate the item in the list or card, click on the actions button, usually identified by three dots, arrow or Actions button, and choose the desired option. Before destructive actions, confirm that the correct item is selected.
- Before saving, publishing, or running commands, confirm that the selected company, group, policy, or device matches the desired scope.
Contextual actions appear in the portal's quick action button and change depending on the user's screen or permission.
¶ ¶ Examples of actions
- Ask Nomid: opens the support assistant.
- Add new device(s): starts the flow to register new devices.
- Create new policy: starts the creation of a new policy.
- Upload app: opens the flow to upload or register an application in the library.
¶ ¶ Keyboard shortcuts
Some actions display key combinations, such as Ctrl + B or shortcut letters. Use them to gain speed in repetitive operations.
Attention: Actions such as creating a policy, registering a device or sending an application depend on administrative permission. If the option does not appear, review the user's role in Settings > Roles & Permissions.
¶ ¶ Help
¶ ¶ Help
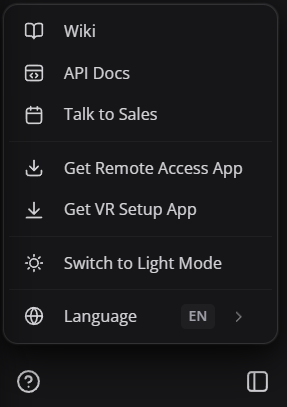
The help/support area accessible through the portal.
This area is used to open documentation, support or guidance channels to resolve questions about using MDM and operating the fleet.
¶ ¶ Featured elements
- Wiki: opens the public documentation used as an operational reference for Nomid MDM.
- API Docs: directs to the technical documentation of the API when the environment has API integration.
- Talk to Sales: opens the commercial channel for questions about plans, hiring or expansion.
- Get Remote Access App: provides the application used in remote support services.
- Get WT Setup App: provides the configuration helper application when applicable to the environment.
- Light/Dark Mode: switches the visual theme to suit the operator's work environment.
- Language: changes the language of the portal interface.
¶ ¶ Operational guidance
- Click the help button and choose between documentation, knowledge base or support. When calling for support, describe the problem, inform the device/policy involved and include screenshots or error messages when possible.
- Before saving, publishing, or running commands, confirm that the selected company, group, policy, or device matches the desired scope.
The help menu brings together useful links to documentation, support, and viewing preferences.
¶ ¶ Common options
- Wiki: opens Nomid MDM public documentation.
- API Docs: opens the API's technical documentation, when available.
- Talk to Sales: channel for commercial contact.
- Get Remote Access App: link to obtain the remote access application used in support.
- Get WT Setup App: link to get the setup app, when applicable to the environment.
- Switch to Light/Dark Mode: switches the visual theme of the portal.
- Language: changes the interface language.
¶ ¶ Common Problems
¶ ¶ I can't log in
Validate that the email is correct, that the organization has enabled the login method used and that the user exists on the portal. In environments with SSO, the account must exist in the identity provider and also be authorized in Nomid MDM.
¶ ¶ I don't see a menu option
The option may be hidden due to permission, contracted plan or unconfigured integration. Confirm with an administrator with access to Settings.
¶ ¶ I'm in the wrong company
Open the user menu and use Switch Company or Switch to Tenant to switch to the correct organization.