¶ ¶ User Manual — Settings
Application or layer: Portal Nomid MDM
Document: V1.0.0
Last updated: 17/06/2026
Language: en_US
The Settings module brings together the administrative settings of the Nomid MDM portal. It manages personal account, organization, platform users, roles and permissions, device users, security, billing and API keys.
Important: Changes to users, roles, security and API may affect administrator access and integrations. Make changes carefully and record important decisions.
¶ ¶ My account
¶ ¶ My account

The main My Account tab within Settings.
This area is used to access the logged in user's personal settings, such as profile, preferences and account security.
¶ ¶ Featured elements
- Profile: gathers personal data from the logged in user.
- Preferences: adjusts language, theme and viewing preferences.
- Security: controls password, sessions and account protection methods.
- Daily use: maintains the portal operator's individual experience and security.
¶ ¶ Operational guidance
- Go to Settings > My Account and choose the desired subsection. Use to adjust personal experience without changing global tenant settings.
- Before saving, publishing, or running commands, confirm that the selected company, group, policy, or device matches the desired scope.
¶ ¶ Profile
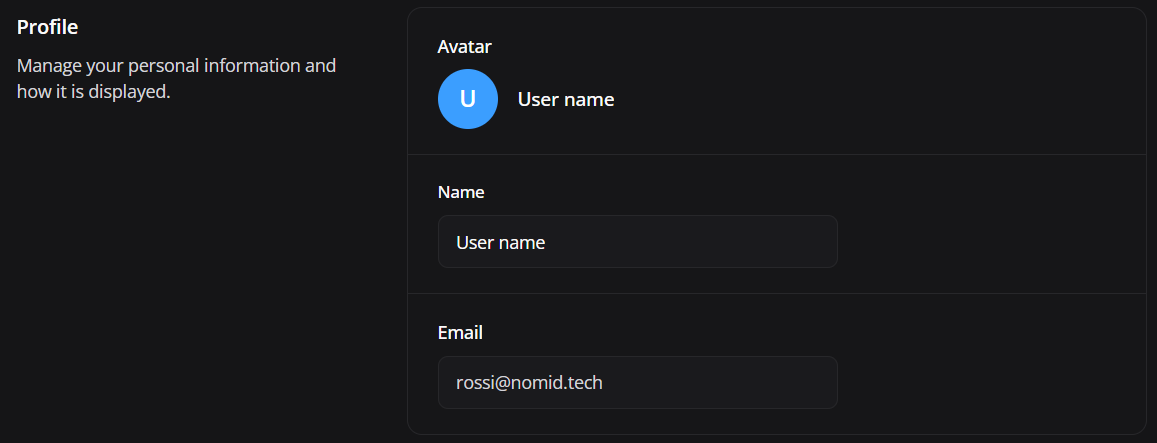
The user account profile section.
This area is used to review or update name, avatar and email, depending on the authentication method and permissions.
¶ ¶ Featured elements
- Name: identifies the operator within the portal.
- Email: shows the login used for authentication and notifications.
- Contact details: facilitate support and internal administration.
- Save changes: saves allowed changes to the account.
¶ ¶ Operational guidance
- Edit the available fields and save. If the email comes from SSO, change it in the identity provider instead of trying to change it directly in Nomid.
- Before saving, publishing, or running commands, confirm that the selected company, group, policy, or device matches the desired scope.
¶ ¶ Preferences
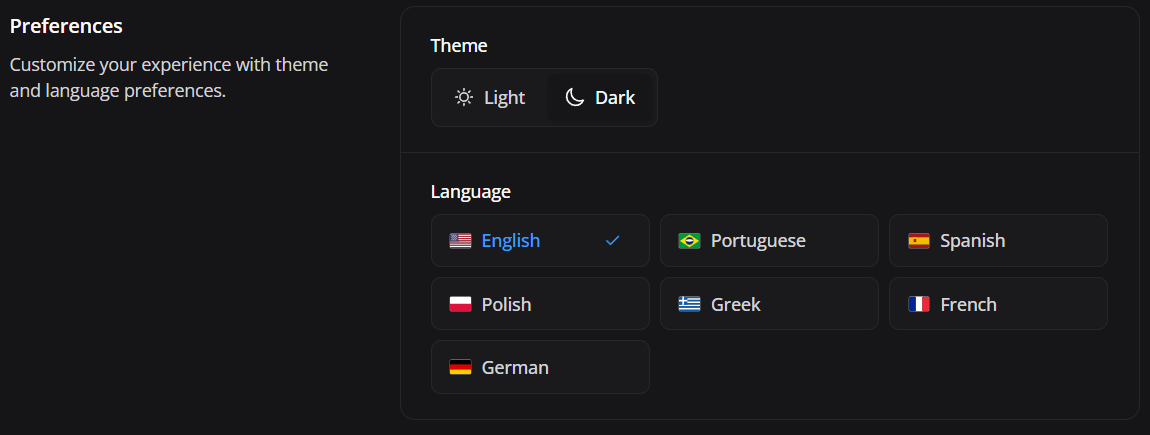
The personal preferences section, including theme and language.
This area is used to adjust the appearance of the portal and the language used by the interface for the logged in user.
¶ ¶ Featured elements
- Language: defines the interface language.
- Theme: changes light or dark visuals.
- Visual preferences: adjust the user experience without changing policies or devices.
- Persistence: maintains preferences for future accesses when supported.
¶ ¶ Operational guidance
- Select light/dark theme and desired language. Save or wait for automatic application depending on the portal. These options do not change the settings for other users.
- Before saving, publishing, or running commands, confirm that the selected company, group, policy, or device matches the desired scope.
¶ ¶ Account security

The security section of the personal account.
This area is used to manage password or security actions linked to the user, when local login is enabled.
¶ ¶ Featured elements
- Password: allows changing or updating the local credential when used.
- Sessions: help control active access.
- MFA/2FA: adds layer of protection when available.
- Good practices: recommend closing sessions on shared equipment.
¶ ¶ Operational guidance
- Use Send forgot link or equivalent option to start password recovery/change. In SSO accounts, manage password and MFA in the identity provider.
- Before saving, publishing, or running commands, confirm that the selected company, group, policy, or device matches the desired scope.
The My Account area contains logged-in user settings.
¶ ¶ Profile
Allows you to review or change personal data, such as name and email, depending on permissions and type of authentication.
¶ ¶ Preferences
Allows you to adjust interface preferences, such as:
- Light or dark theme.
- Portal language.
- Visual preferences available in the tenant.
¶ ¶ Security
Gathers account-related security actions, such as changing or recovering a password, when local login is enabled.
¶ ¶ Organization
¶ ¶ Organization

The main organization details tab.
This area is used to access global tenant settings such as company data, time zone, and administrative information.
¶ ¶ Featured elements
- Company data: shows tenant identification.
- Global settings: affect general behavior of the portal.
- Central administration: maintains information used in support, billing and auditing.
- Restricted access: normally requires an administrative profile.
¶ ¶ Operational guidance
- Access Organization Details to review general data. Changes in this area may affect reports, schedules, and environment identification.
- Before saving, publishing, or running commands, confirm that the selected company, group, policy, or device matches the desired scope.
¶ ¶ Configure organization
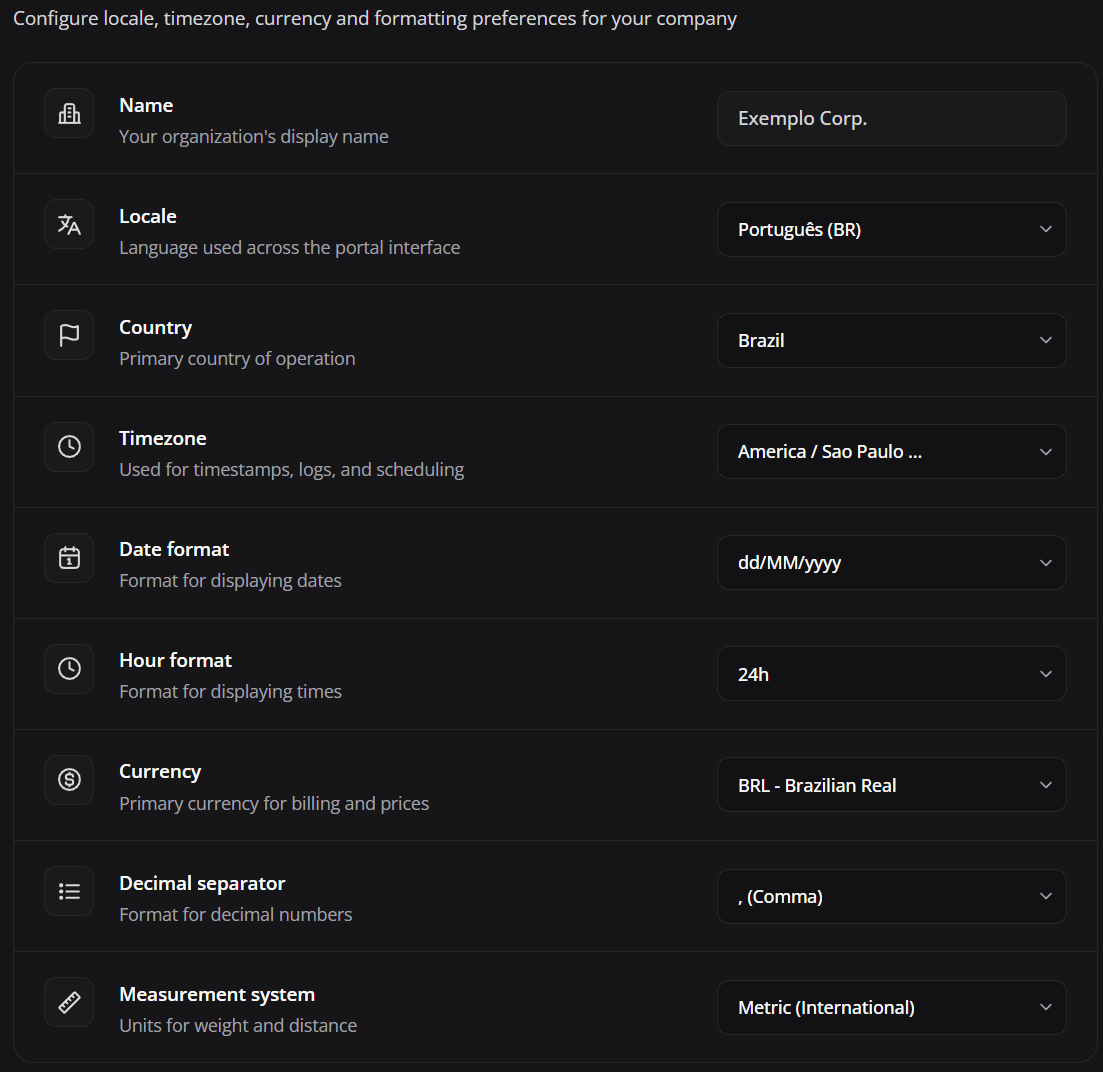
The organization configuration form.
This area is used to edit the tenant's name, language/region, time zone, address, contacts, and administrative preferences.
¶ ¶ Featured elements
- Organization name: identifies the tenant in the portal.
- Administrative data: supports support, billing and governance.
- Organization preferences: define global behaviors when available.
- Save: applies changes to the entire environment.
- Attention: global changes may affect all administrators.
¶ ¶ Operational guidance
- Update the fields with official data and save. Pay special attention to the time zone, as it affects histories, timefence, reports, and interpretation of events.
- Before saving, publishing, or running commands, confirm that the selected company, group, policy, or device matches the desired scope.
The Organization Details tab contains general tenant data.
¶ ¶ What can be configured
- Name of the organization.
- Registration information.
- Time zone.
- Regional preferences.
- Contact or support details.
- Administrative settings linked to the company.
Tip: The organization's time zone impacts reports, history, timefence and interpretation of events.
¶ ¶ Platform users
¶ ¶ Platform users

The platform's main users tab.
This area is used to manage who accesses the Nomid MDM portal and with what roles/permissions.
¶ ¶ Featured elements
- Platform users: are operators who access the administrative portal.
- Invitation: creates or sends access to a new user.
- Permissions: define visible areas and permitted actions.
- Daily management: maintains access aligned with each person's role.
¶ ¶ Operational guidance
- Access Platform Users to list, create, edit or disable administrators. Use minimum required profiles to prevent unauthorized access.
- Before saving, publishing, or running commands, confirm that the selected company, group, policy, or device matches the desired scope.
¶ ¶ User list
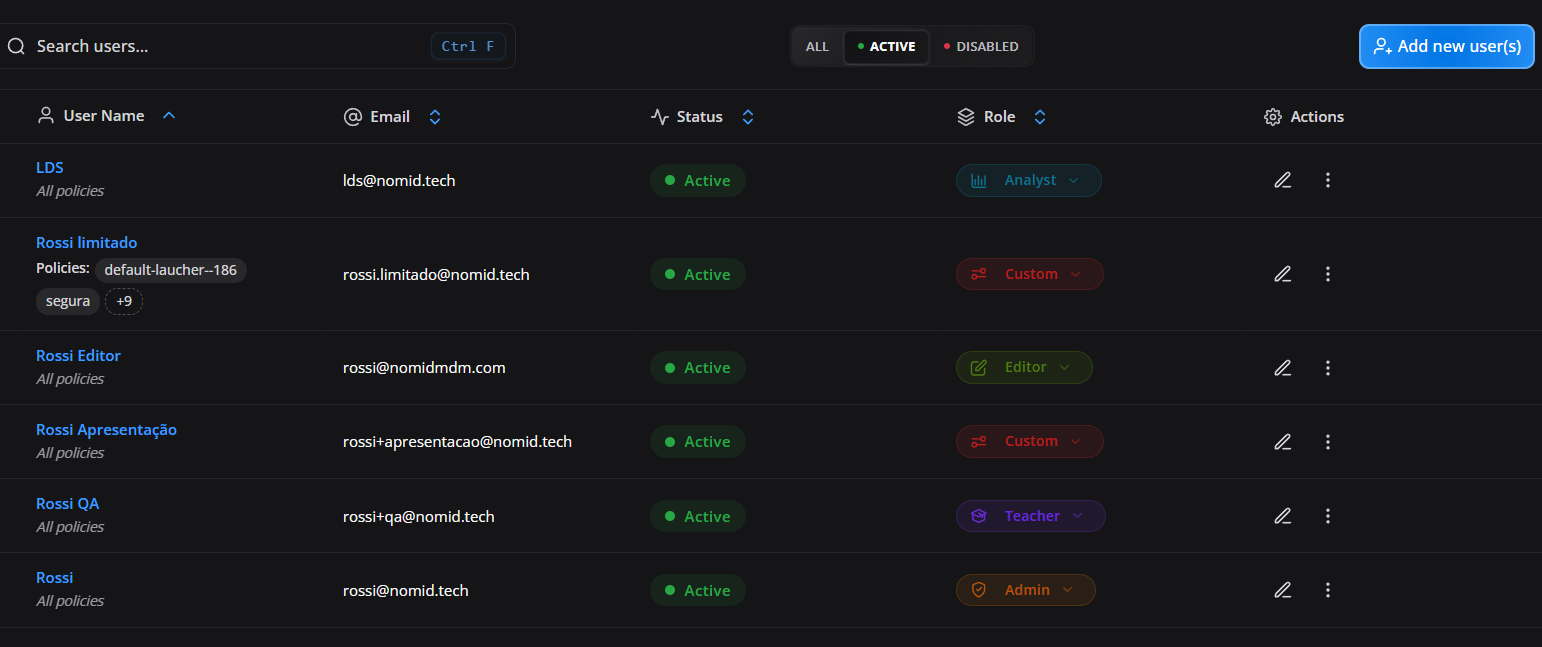
The list of registered administrative users.
This area is used to consult the name, email, status, roles and actions available for each user.
¶ ¶ Featured elements
- User: shows the name and email of the registered operator.
- Status: indicates whether access is active, pending or blocked.
- Role: defines the set of permissions granted.
- Actions: allow you to edit, re-invite, deactivate or review access.
- Search: quickly locates users in environments with many operators.
¶ ¶ Operational guidance
- Use search/filters to locate the user. Click edit to change data, role or permissions. Deactivate users who should no longer access the tenant.
- Before saving, publishing, or running commands, confirm that the selected company, group, policy, or device matches the desired scope.
¶ ¶ Edit user
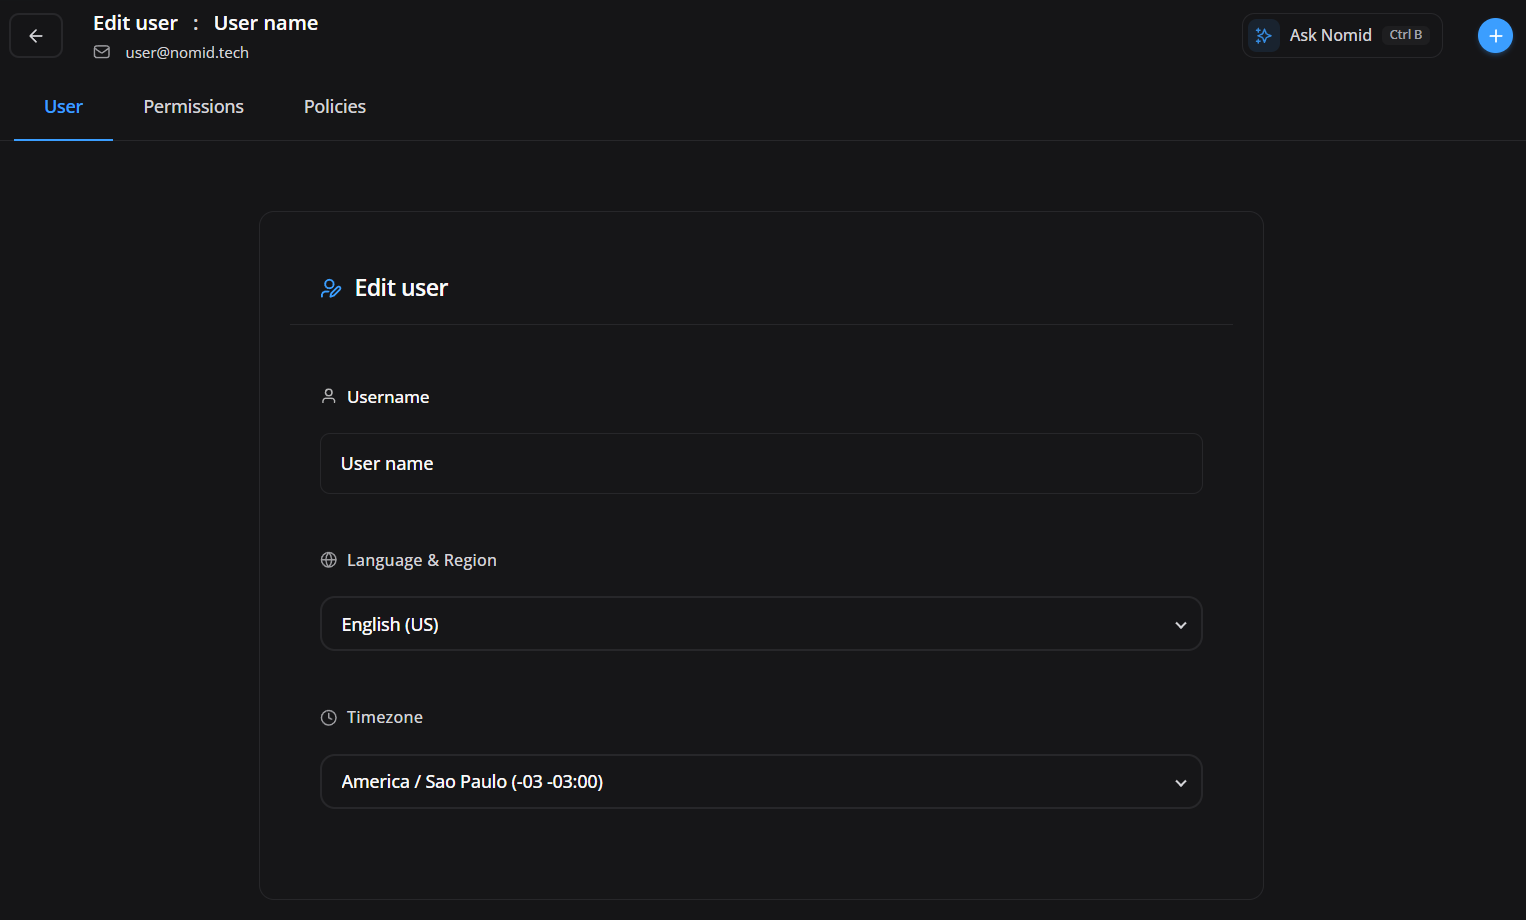
The platform user creation or edit form.
This area is used to configure the name, email, status and basic attributes of an administrative user.
¶ ¶ Featured elements
- User data: allows you to review name, email and administrative information.
- Access status: activates or deactivates the operator.
- Assigned roles: define what the user can see and change.
- Scope: can limit access by company, group or policy when available.
- Save: applies the permission change.
¶ ¶ Operational guidance
- Fill in name and email, choose active/inactive status and save. Then assign roles/permissions to define what this user can access.
- Before saving, publishing, or running commands, confirm that the selected company, group, policy, or device matches the desired scope.
¶ ¶ User roles

The user role/role selection step.
This area is used to assign ready-made or customized roles, such as administrator, support, finance, teacher or operator with limited access.
¶ ¶ Featured elements
- Role: represents the user's permission profile.
- Role assignment: grants capabilities such as reading, editing, support or administration.
- Multiple roles: can combine permissions when the portal allows it.
- Review: must follow the principle of least privilege.
¶ ¶ Operational guidance
- Select the paper suitable for the user's work. Avoid granting full admin when the user only needs to query specific devices or policies.
- Before saving, publishing, or running commands, confirm that the selected company, group, policy, or device matches the desired scope.
¶ ¶ Permissions 1
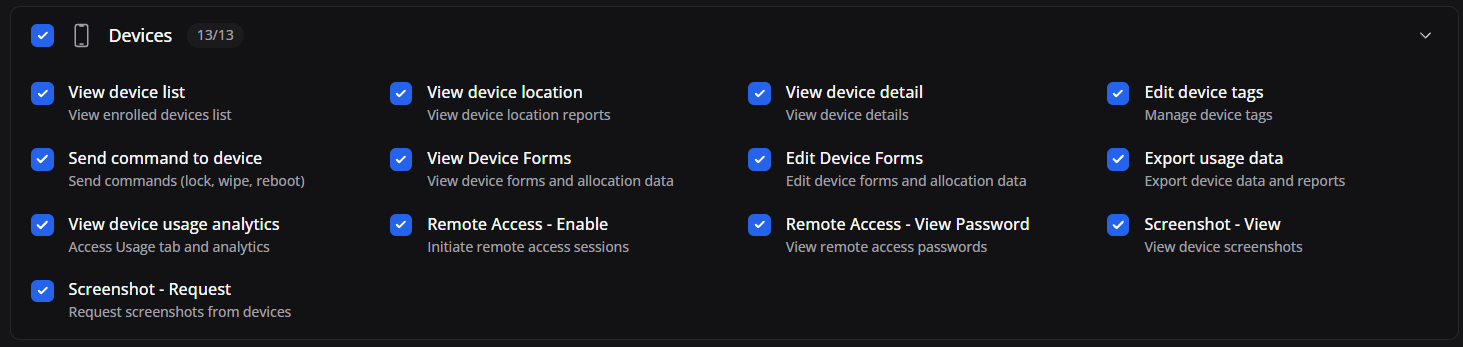
The first block of user permissions, with controls by area or module.
This area is used to enable or deny access to groups of functionality, such as devices, policies, library, integrations, or settings.
¶ ¶ Featured elements
- Permission categories: group access by portal module.
- View: authorizes reading without alteration.
- Create/edit: authorizes maintenance of registrations and configurations.
- Perform actions: authorizes operational commands on devices or policies.
- Delete: should only be granted to trusted administrators.
- Restricted scope: limits visibility to specific groups, policies or areas when available.
¶ ¶ Operational guidance
- Check only required permissions. For support users, reading and some operational actions in Devices are usually enough, without releasing Settings or Billing.
- Before saving, publishing, or running commands, confirm that the selected company, group, policy, or device matches the desired scope.
¶ ¶ Permissions 2

The second block of permissions, with specific operation actions.
This area is used to refine what the user can do within modules, such as view, create, edit, perform actions, or remove items.
¶ ¶ Featured elements
- Permission categories: group access by portal module.
- View: authorizes reading without alteration.
- Create/edit: authorizes maintenance of registrations and configurations.
- Perform actions: authorizes operational commands on devices or policies.
- Delete: should only be granted to trusted administrators.
- Restricted scope: limits visibility to specific groups, policies or areas when available.
¶ ¶ Operational guidance
- Review each action before saving. Actions such as wipe, remove device, change policy and edit user must be restricted to trusted profiles.
- Before saving, publishing, or running commands, confirm that the selected company, group, policy, or device matches the desired scope.
¶ ¶ Permissions 3

The third block of permissions, with additional permissions per resource.
This area is used to control granular access to add-on functionality, reports, integrations, policy features, or administrative areas.
¶ ¶ Featured elements
- Permission categories: group access by portal module.
- View: authorizes reading without alteration.
- Create/edit: authorizes maintenance of registrations and configurations.
- Perform actions: authorizes operational commands on devices or policies.
- Delete: should only be granted to trusted administrators.
- Restricted scope: limits visibility to specific groups, policies or areas when available.
¶ ¶ Operational guidance
- Mark permissions according to the internal process. When in doubt, start with smaller access and expand only after validating a real need.
- Before saving, publishing, or running commands, confirm that the selected company, group, policy, or device matches the desired scope.
¶ ¶ Permissions 4

The fourth permissions block, displaying extra access categories.
This area is used to limit sensitive resources and separate responsibilities between operations, support, security, finance and administration.
¶ ¶ Featured elements
- Permission categories: group access by portal module.
- View: authorizes reading without alteration.
- Create/edit: authorizes maintenance of registrations and configurations.
- Perform actions: authorizes operational commands on devices or policies.
- Delete: should only be granted to trusted administrators.
- Restricted scope: limits visibility to specific groups, policies or areas when available.
¶ ¶ Operational guidance
- Use this block to prevent operators from having access to data or changes outside of their role. Save and test with the user to confirm that the scope is correct.
- Before saving, publishing, or running commands, confirm that the selected company, group, policy, or device matches the desired scope.
¶ ¶ Permissions 5

The fifth block of permissions, with final permissions or complementary scopes.
This area is used to complete granular configuration of user access, including special permissions or restrictions per feature.
¶ ¶ Featured elements
- Permission categories: group access by portal module.
- View: authorizes reading without alteration.
- Create/edit: authorizes maintenance of registrations and configurations.
- Perform actions: authorizes operational commands on devices or policies.
- Delete: should only be granted to trusted administrators.
- Restricted scope: limits visibility to specific groups, policies or areas when available.
¶ ¶ Operational guidance
- Review all markings before saving. After saving, ask the user to access the portal and validate that they can only perform the planned activities.
- Before saving, publishing, or running commands, confirm that the selected company, group, policy, or device matches the desired scope.
The Platform Users tab manages who can access the administrative portal.
¶ ¶ User list
The list displays registered users, email, status, roles and available actions.
¶ ¶ Create or edit user
Common fields:
- Name.
- Email.
- Role/function.
- Status.
- Additional permissions or access restrictions.
¶ ¶ Roles and permissions
Permissions define what the user can view, create, edit, delete or execute within the portal. They can involve modules such as Devices, Policies, Library, Integrations, Billing, API, users and configurations.
¶ ¶ Use with limited scope
For users who must access only part of the operation, create a specific role and limit visibility according to the tenant's design. Example: A teacher profile can only view devices linked to certain policy groups.
Attention: Avoid granting broad administrative permission to users who only need to query devices or reports.
¶ ¶ Roles
¶ ¶ Roles

The main roles and permissions tab.
This area is used to create, query and manage reusable permission profiles for platform users.
¶ ¶ Featured elements
- Role list: shows existing permission profiles.
- Name and description: help you choose the correct profile.
- Number of users: indicates current use of the paper.
- Actions: allow you to edit, duplicate or remove unused roles.
- Governance: maintains standardized and auditable permissions.
¶ ¶ Operational guidance
- Visit Roles & Permissions to review existing roles. Use default roles to avoid configuring permissions on a user-by-user basis.
- Before saving, publishing, or running commands, confirm that the selected company, group, policy, or device matches the desired scope.
¶ ¶ Create paper
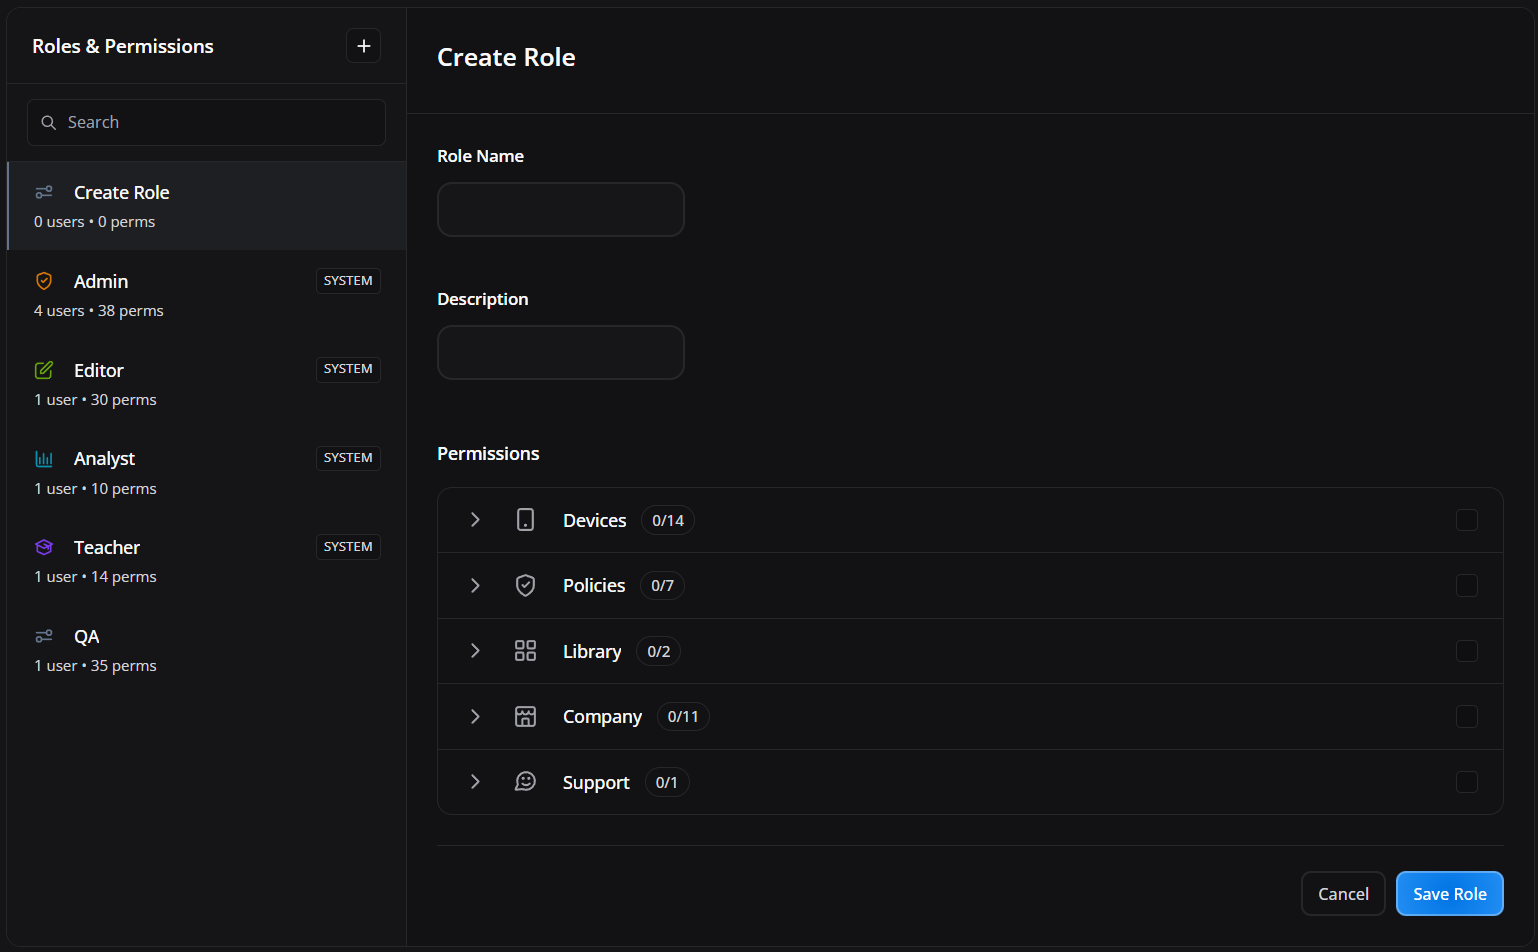
The role/access profile creation form.
This area is used to create a set of permissions with name, description and scope to reuse across multiple users.
¶ ¶ Featured elements
- Role name: identifies the access profile, such as Support, Teacher or Administrator.
- Description: documents the purpose of the paper.
- Selected permissions: define exactly what the user can do.
- Scope: limits access to groups or policies when applicable.
- Save: creates the role to be assigned to platform users.
¶ ¶ Operational guidance
- Provide a clear name, describe the purpose of the role and mark permissions. Example: “Teacher — reading devices from the School X group”. Save and assign to corresponding users.
- Before saving, publishing, or running commands, confirm that the selected company, group, policy, or device matches the desired scope.
The Roles & Permissions tab allows you to create reusable roles.
¶ ¶ What is it for
- Standardize permissions by role.
- Avoid configuring each user manually.
- Separate access from administrators, support, operations, finance, teachers or partners.
- Reduce the risk of undue changes.
¶ ¶ When creating a role
- Define clear name and description.
- Check only required permissions.
- Test with a validation user.
- Periodically review old papers.
¶ ¶ Device users
¶ ¶ Device Users

The main device users tab.
This area is used to manage end users or identities associated with devices, when the company process uses user-device linking.
¶ ¶ Featured elements
- Device users: represent people, students, collaborators or profiles linked to assets.
- List: shows users registered for membership.
- Search: quickly locates the person responsible.
- Actions: allow you to edit or maintain records.
- Allocation: relates user to device in inventory.
¶ ¶ Operational guidance
- Access Device Users to consult or create records. Use to organize ownership, responsibility, or authentication tied to equipment.
- Before saving, publishing, or running commands, confirm that the selected company, group, policy, or device matches the desired scope.
¶ ¶ Create device user
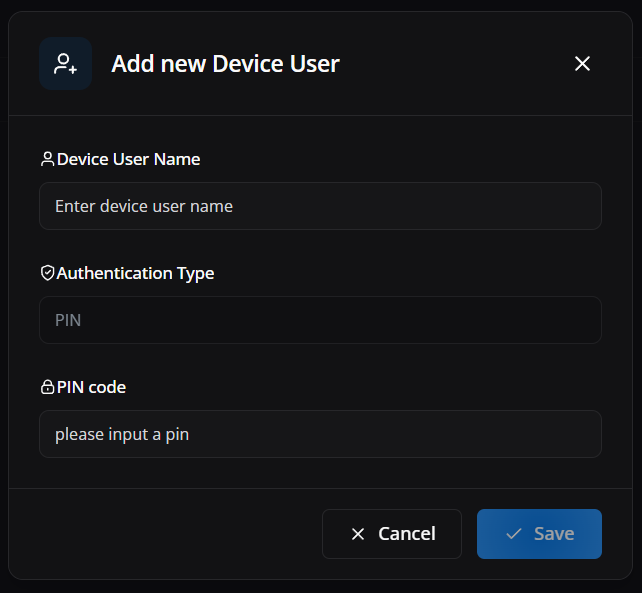
The form to add device user.
This area is used to register name/identifier, authentication type and PIN or credentials related to the end user.
¶ ¶ Featured elements
- Create device user: identifies the portal area represented on the screen.
- Fields and indicators: present information that guides the administrator's operational decision.
- Buttons and actions: perform changes, filters, registration or navigation depending on the open module.
- Expected result: keeps the management of mobile assets more traceable, standardized and secure.
¶ ¶ Operational guidance
- Fill in the mandatory fields, define the authentication type and save. Use consistent data to facilitate allocation, auditing and end-user support.
- Before saving, publishing, or running commands, confirm that the selected company, group, policy, or device matches the desired scope.
The Device Users tab allows you to register end users or identities used on devices.
¶ ¶ Common fields
- Device username.
- Type of authentication.
- PIN or operational credential, when applicable.
¶ ¶ When to use
- To relate a device to an end user.
- For local PIN operations.
- For allocation or responsibility control.
- For scenarios where the device is shared in turns.
¶ ¶ Security
¶ ¶ Security

The main tenant administrative security tab.
This area is used to configure authentication methods, allowlist of emails/domains and rules that protect access to the portal.
¶ ¶ Featured elements
- Compliance indicators: summarize devices at risk, pending configuration or inadequate security posture.
- Critical events: must be handled before low priority adjustments.
- Relationship with policies: allows you to identify whether password, FRP, restrictions, Play Integrity or blocks are applied correctly.
- Latest report: helps differentiate active problem from old information sent by the device.
¶ ¶ Operational guidance
- Access Security in Settings and review enabled methods. Before restricting access, confirm that essential administrators will still be able to sign in.
- Before saving, publishing, or running commands, confirm that the selected company, group, policy, or device matches the desired scope.
¶ ¶ Authentication methods

The authentication methods section of the portal.
This area is used to enable or review login via email/password, Google, Microsoft or configured providers, as supported by the tenant.
¶ ¶ Featured elements
- Local login: controls the use of email and portal password.
- Google/Microsoft/SSO: defines accepted providers for authentication.
- Mandatory: can direct users to corporate authentication.
- Impact: affects all tenant operators according to configuration.
¶ ¶ Operational guidance
- Activate company-approved methods and disable unused methods. Test each method with a pilot user before making it mandatory.
- Before saving, publishing, or running commands, confirm that the selected company, group, policy, or device matches the desired scope.
¶ ¶ Email Allowlist
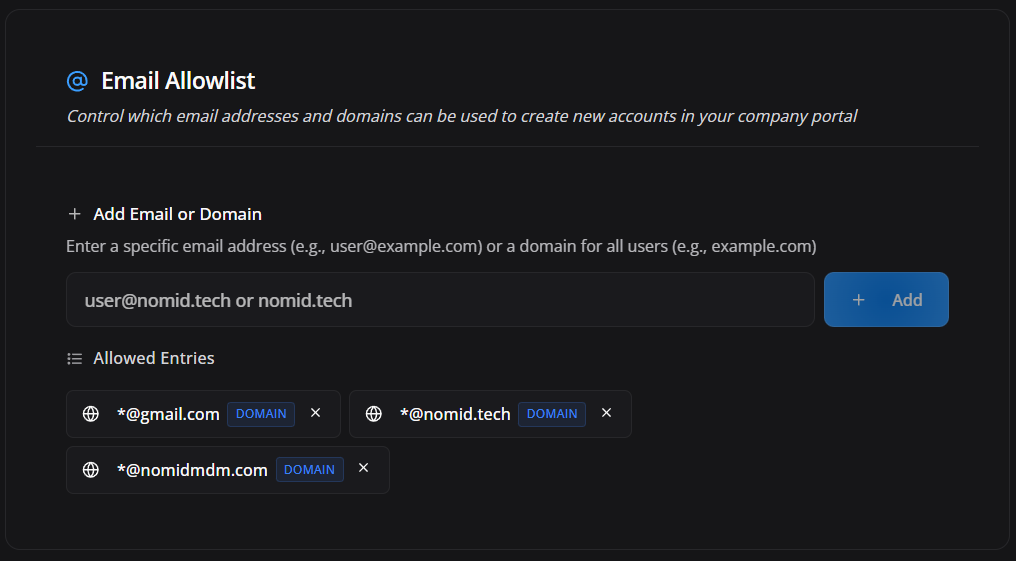
The email/domain allowlist section.
This area is used to restrict which domains or emails can be used for access/invitation on the portal.
¶ ¶ Featured elements
- Allowed domains: limit which emails can access or be invited.
- Specific emails: allow exceptions when necessary.
- Preventive blocking: prevents registration of undue personal or external accounts.
- Review: must follow changes in team and suppliers.
¶ ¶ Operational guidance
- Add trusted corporate domains and remove personal domains when policy requires. Save and test invitations to avoid blocking legitimate users.
- Before saving, publishing, or running commands, confirm that the selected company, group, policy, or device matches the desired scope.
The Security tab controls portal access rules.
¶ ¶ Authentication Methods
Defines which login methods can be used by users, such as email, Google, Microsoft or SSO authentication, depending on configured integrations.
¶ ¶ Email Allowlist
Allows you to restrict which domains or emails can access or create accounts on the portal.
¶ ¶ Good practices
- Use domain allowlist whenever possible.
- Remove login methods that the company does not use.
- Keep SSO as the default when the organization requires centralized control.
- Review inactive users periodically.
¶ ¶ Billing
¶ ¶ Billing

The main billing tab.
This area is used to access plan, current usage, payment, billing contacts, and transaction history.
¶ ¶ Featured elements
- Billing: centralizes plan, usage, payment, contacts and history.
- Contractual view: shows the tenant's commercial situation.
- Usage tracking: helps predict fleet expansion.
- Financial management: reduces billing failures and loss of access.
¶ ¶ Operational guidance
- Access Billing to review the tenant's commercial situation. Use this area to check contracted consumption and billing data before activating finance.
- Before saving, publishing, or running commands, confirm that the selected company, group, policy, or device matches the desired scope.
¶ ¶ Plan

The contracted plan section.
This area is used to view plan type, commercial conditions or subscription information available on the portal.
¶ ¶ Featured elements
- Contracted plan: shows active mode.
- Limits: indicate number of devices, resources or plan conditions.
- Renewal/change: guides expansion or commercial adjustment.
- Administrative use: helps predict the need for upgrades.
¶ ¶ Operational guidance
- Check the plan before asking questions about device or resource limits. If necessary, contact sales/support to change the plan.
- Before saving, publishing, or running commands, confirm that the selected company, group, policy, or device matches the desired scope.
¶ ¶ Current usage

The current usage section of the plan.
This area is used to track tenant consumption, such as the number of active/managed devices and metrics used for billing.
¶ ¶ Featured elements
- Accounted devices: show current consumption of the plan.
- Usage metrics: help monitor fleet growth.
- Surplus: signal the need for contractual adjustment.
- Audit: allows you to compare billing with actual inventory.
¶ ¶ Operational guidance
- Review usage periodically and compare with contract. When consumption is close to the limit, plan to expand or clean out old devices.
- Before saving, publishing, or running commands, confirm that the selected company, group, policy, or device matches the desired scope.
¶ ¶ Payment

The payment section.
This area is used to consult or manage payment methods/information when the portal provides this control.
¶ ¶ Featured elements
- Payment method: records the method used for billing.
- Financial data: must be kept up to date to avoid interruptions.
- Status: indicates pending, validity or need for updating.
- Restricted access: must be limited to financial administrators.
¶ ¶ Operational guidance
- Review payment details and keep information up to date. Access to this area must be restricted to financial profiles or authorized administrators.
- Before saving, publishing, or running commands, confirm that the selected company, group, policy, or device matches the desired scope.
¶ ¶ Billing contacts

The billing contacts section.
This area is used to define who receives financial communications, notes, charges or notices related to the plan.
¶ ¶ Featured elements
- Financial contact: receives billing communications.
- Billing email: centralizes notes, notices and receipts.
- Administrative manager: helps support handle commercial issues.
- Update: must follow internal changes within the company.
¶ ¶ Operational guidance
- Add emails responsible for finance/purchases and remove outdated contacts. Use shared company contacts when possible.
- Before saving, publishing, or running commands, confirm that the selected company, group, policy, or device matches the desired scope.
¶ ¶ Transaction history
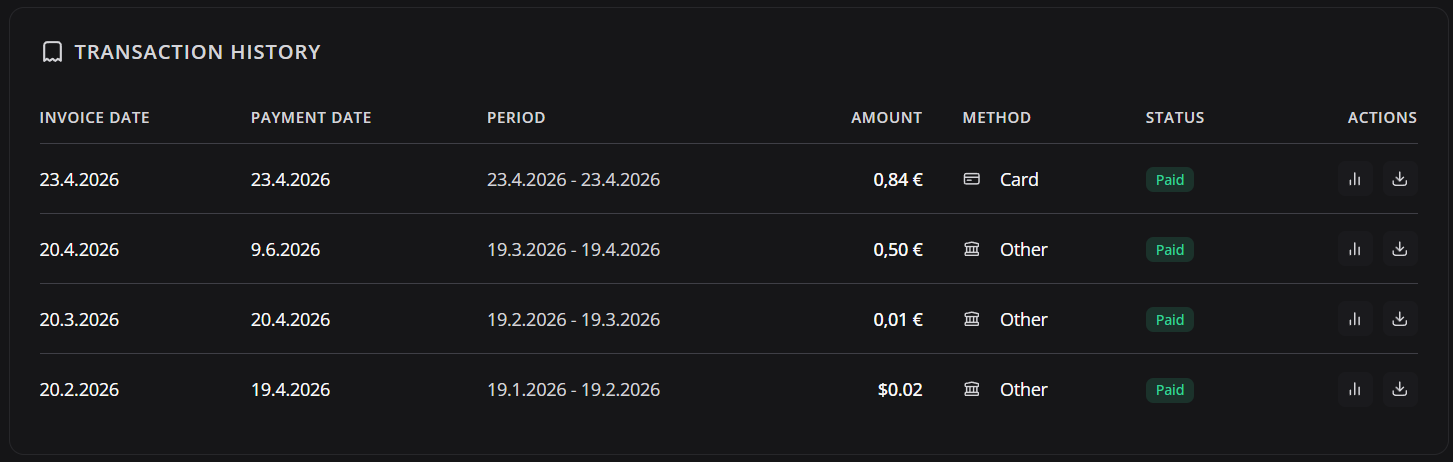
The transaction history section.
This area is used to consult charges, payments, periods, amounts and status of registered transactions.
¶ ¶ Featured elements
- Transactions: list charges, payments or financial events.
- Data: allows you to locate movements by period.
- Status: shows paid, pending, failed or canceled according to registration.
- Proof/detail: supports financial reconciliation and auditing.
¶ ¶ Operational guidance
- Use filters or the list to find a specific period. Download or view records when you need to reconcile billing with MDM usage.
- Before saving, publishing, or running commands, confirm that the selected company, group, policy, or device matches the desired scope.
The Billing tab shows plan, usage, payment, financial contacts and history data.
¶ ¶ Common sections
- Plan: contracted plan and limits.
- Current month usage: current month usage.
- Payment: payment method or instructions, when applicable.
- Billing contacts: recipients of charges and notifications.
- Transaction history: history of invoices, charges or transactions.
Note: Billing content may vary depending on the commercial model, contracted plan and user profile.
¶ ¶ API Keys
¶ ¶ API

The main API Keys tab.
This area is used to manage API keys used by external integrations, automations and systems that talk to Nomid MDM.
¶ ¶ Featured elements
- API: enables external integrations with Nomid.
- API Keys: authenticate third-party systems.
- Scopes: limit access according to integration needs.
- Audit: must monitor the creation, use and revocation of credentials.
¶ ¶ Operational guidance
- Access API to review existing keys. Keep few keys active, with clear names and a defined purpose.
- Before saving, publishing, or running commands, confirm that the selected company, group, policy, or device matches the desired scope.
¶ ¶ API Keys

The list of registered API keys.
This area is used to view name, creation, last use, and actions to manage integration credentials.
¶ ¶ Featured elements
- Key list: shows credentials created for integrations.
- Name/description: identifies the consumer system.
- Status and expiration: indicate whether the key can still be used.
- Actions: allow you to revoke, renew or create credentials.
- Security: never share keys on insecure channels.
¶ ¶ Operational guidance
- Periodically review keys and remove any that are no longer used. Never share keys in public chats, unsecured tickets, or open documentation.
- Before saving, publishing, or running commands, confirm that the selected company, group, policy, or device matches the desired scope.
¶ ¶ Create API Key

The new API key creation form.
This area is used to generate a credential for integration with external systems or authorized automations.
¶ ¶ Featured elements
- Key name: identifies the integration that will use the credential.
- Permissions/scope: limit what the API can access.
- Expiration: reduces risk in the event of a leak.
- Token generated: must be copied and stored securely.
- Rotation: must occur periodically or after changing suppliers.
¶ ¶ Operational guidance
- Enter a name that identifies the system and purpose, click create and copy the key only to the vault/secure integration environment. After that, treat the key as a secret.
- Before saving, publishing, or running commands, confirm that the selected company, group, policy, or device matches the desired scope.
The API tab allows you to create and manage keys used by external integrations.
¶ ¶ Create key
Enter a descriptive name, such as BI Integration, ERP Integration or Support Automation. After creating, store the key in a safe place.
¶ ¶ API best practices
- Create one key per integration.
- Do not share the key via email or chat without protection.
- Revoke keys that are no longer used.
- Rotate keys periodically.
- Use names that allow you to quickly identify the person responsible.
¶ ¶ Administration checklist
- Do platform users have only necessary permissions?
- Are roles named and documented?
- Have inactive users been removed or deactivated?
- Is the domain allowed in Security correct?
- Are billing contacts up to date?
- Have old API keys been revoked?
- Is there at least one administrator responsible for each critical integration?